Software Training Session 3

Training material and helpful references for FIRST Robotics Competition (FRC) software development.

Part 1:

Currently we have been developing our code our own computers. For a real software project, it is best to have revision control scheme in place that allow for checking in your code into some repository.  In addition when working on a robot software project with multiple programmers, there should be a good way for each person to add new features and then release it to the team.  Git is a type of revision control system. Specifically we are using GitHub for revision control.

Next step is to open a new VS Code project and clone this repository:

https://github.com/djsandtoes/LCC_Robotics_Training.git
This will populate the repository on your computer.  After this, you will want to create a branch, and give it a unique name like myname_branch.  Run a build to confirm the code is clean.This code include support for PID and we will review and test it.

NOTE:  Rev Robotics provides example JAVA go for FRC which is was utilized here.  You can find this specific example at:

https://github.com/REVrobotics/REVLib-Examples/blob/main/Java/SPARK/Closed%20Loop%20Control/src/main/java/frc/robot/Robot.java

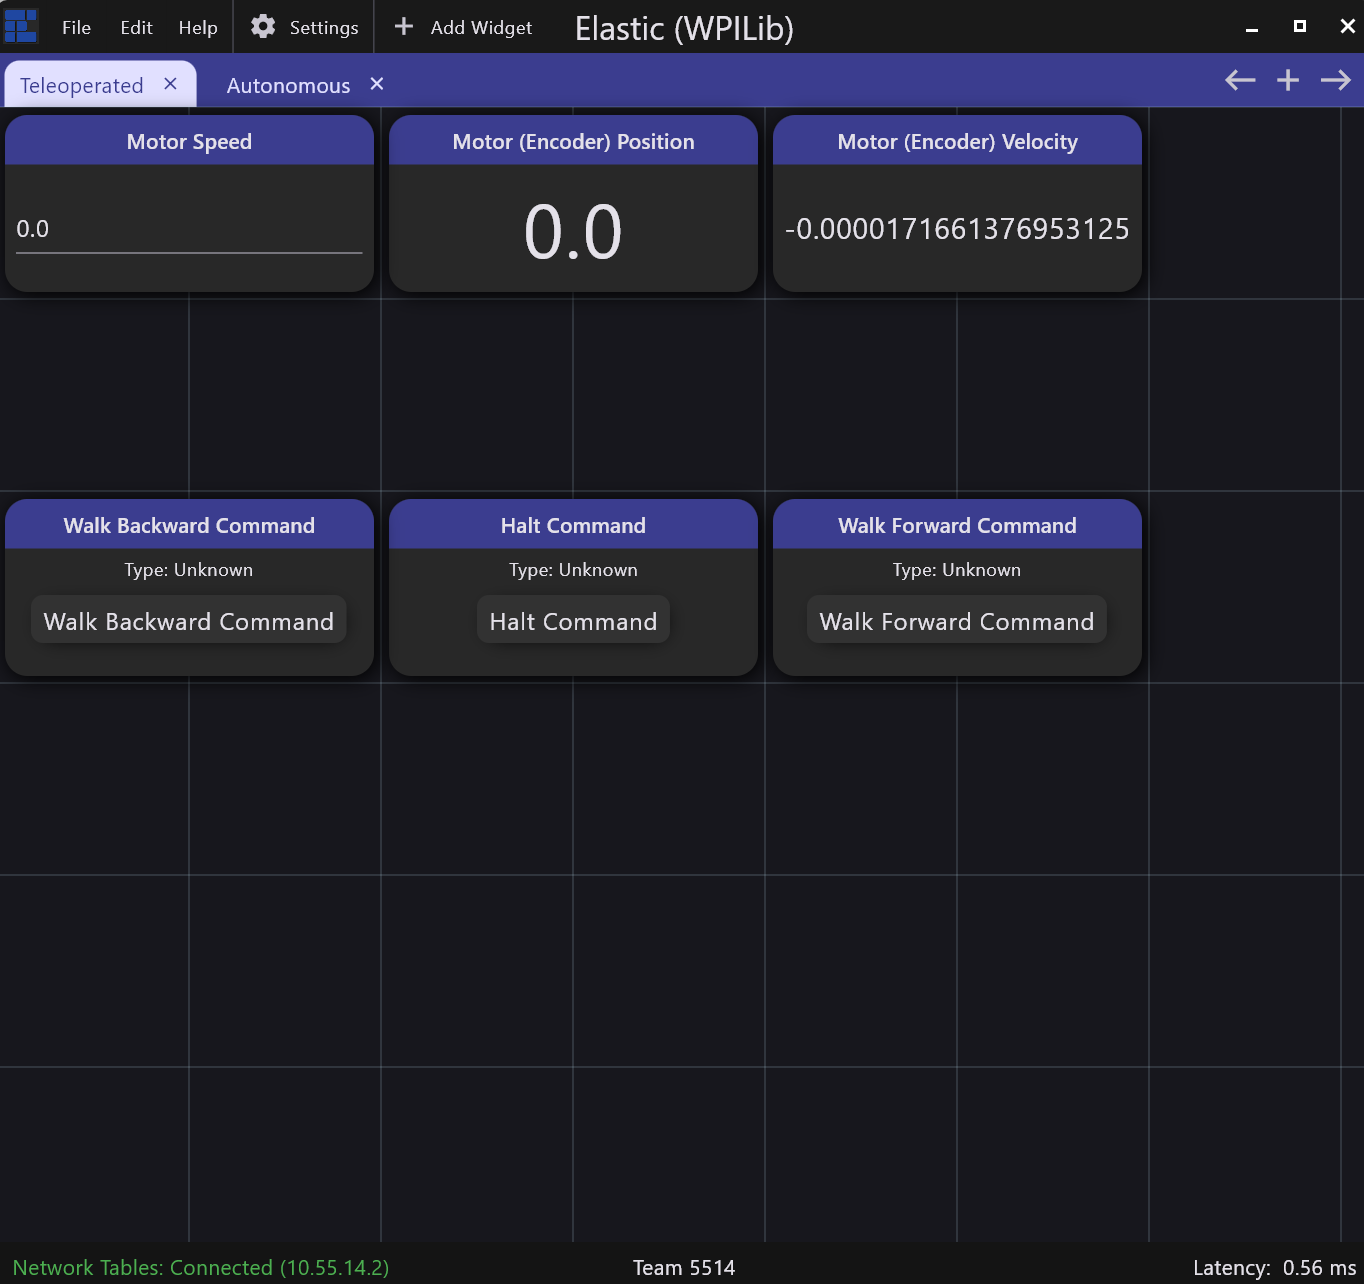
Note you will also see we have added a more subsystems, including:

Give it a try!

Next lets try to add a command that actually is composed of multiple commands.

Part 2:

This section will incorporate a Raspberry PI with a camera running PhotonVision which we will use to detect AprilTags and display to the Dashboard information when it see them.

<..>

Part 3:

This section will focus on using a baselined code base for our swerve drive based robot, along with one simple other subsystem and pathplanner-based autonomous routines.

First create a new project in VS Code by cloning this repository from github:

In addition, you will want to install (if not already installed), PathPlanner from here:

Note that currently there is a transition to the new 2025 version which as of today is still in Beta. The documentation is for the 2025 version, but the latest stable version to install is 2024.1.7:

What to review in this code base:

  1. DriveTrainSubsystem.java
  2. ServoSubsystem.java
  3. SwerveGamepadDriveCommand.java
  4. RobotContainer.java

What to try with this code base:

  1. Deploy code to robot and try to drive it with XBOX controller.
  2. Add support for raising and lowering the Flag via XBOX controller buttons.
  3. Test autonomous mode and the two available autos (MoveOut, MoveOutWithSpin)
  4. Change the existing autos and/or add a new one and retest the autos to confirm the robot responds as expected.

Software Training Session 2

Training material and helpful references for FIRST Robotics Competition (FRC) software development.
TBD

Part 1

The last update made to the code was to simply get the motor to turn on.  Instead let’s make the necessary code changes so that:

  1. The subsystem support methods for changing the motor speed (based on voltage applied) and direction.
    1. Reference https://docs.wpilib.org/en/stable/docs/software/commandbased/subsystems.html
  2. That commands are used to execute those commands in the sub-system.
    1. Reference: https://docs.wpilib.org/en/stable/docs/software/commandbased/commands.html
  3. That commands can be initiated and via a Dashboard or Shuffleboard:
    1. Reference: https://docs.wpilib.org/en/stable/docs/software/dashboards/index.html

Code we can try adding:

Constants.java

public static class MotorSpeedConstants {
  public static final double CRAWL_FORWARD = 0.01;
  public static final double WALK_FORWARD = 0.02;
  public static final double RUN_FORWARD = 0.03;
  public static final double CRAWL_BACKWARD = -0.01;
  public static final double WALK_BACKWARD = -0.02;
  public static final double RUN_BACKWARD = -0.03;
}
RobotContainer.java
Add this import at near top of file where the other imports are:

import edu.wpi.first.wpilibj.smartdashboard.SmartDashboard;

Now add these into class:

public RobotContainer() {

  SmartDashboard.putData("Walk Forward Command", m_exampleSubsystem.walkForward());
  SmartDashboard.putData("Halt Command", m_exampleSubsystem.Halt());
  SmartDashboard.putData("Walk Backward Command", m_exampleSubsystem.walkBackward());

  // Configure the trigger bindings
  //configureBindings();
}
ExampleSubsystem.java
Add this import at near top of file where the other imports are:

import edu.wpi.first.wpilibj.smartdashboard.SmartDashboard;
Now add these into class:

public void SetSpeed (double speed) {
  motor.set(speed);
}
public Command walkForward() {
  return runOnce(() -> SetSpeed(MotorSpeedConstants.WALK_FORWARD));
}
public Command runForward() {
  return runOnce(() -> SetSpeed(MotorSpeedConstants.RUN_FORWARD));
}
public Command crawlBackward() {
  return runOnce(() -> SetSpeed(MotorSpeedConstants.CRAWL_BACKWARD));
}
public Command walkBackward() {
  return runOnce(() -> SetSpeed(MotorSpeedConstants.WALK_BACKWARD));
}
public Command runBackward() {
  return runOnce(() -> SetSpeed(MotorSpeedConstants.RUN_BACKWARD));
}
public Command Halt() {
  return runOnce(() -> SetSpeed(0));
}


public void periodic() {
  // This method will be called once per scheduler run
  SmartDashboard.putNumber("Motor Speed", motor.get());
}
Comment out the setting of the motor power like below because instead we will control via commands
  public ExampleSubsystem() {
    ...
    //motor.set(0.2)
Next ensure the code builds clean.  If so, next step will be to deploy the code to the Roborio and enable it.  Once enabled, go the the settings tab on the Driver Station (the one with a gear icon), and select Dashboard Type = SmartDashboard.  What do you see?  You should see what you added to the SmartDashboard.  Try the buttons to see if they work as you expect.
Now we will try using a different Dashboard that has more option and is better visually call Elastic, you can find it in the WPILib Tools area.  Once it opens, try adding some widgets.  For example here is mine:

Currently the motor’s speed and direction is changed using the .set() method.  This just translates into a specific voltage applied to the motor.

  • What if we want to spin the motor’s axle at a specific rate (velocity)?
  • What if the motor’s axle was connected to arm where we wanted to move the arm to a specific angle (position)?

This requires a sensor called an “Encoder”.  Lets consider the following steps required to add support Position:

  1. Add an encoder object to the subsystem that controls the motor.
  2. Add functions to the subsystem to get the encoder Distance measurement.
  3. Update ExampleCommand.java to implement a command requests we “CRAWL” to a specific distance within some tolerance.
  4. Add these commands to the “SmartDashboard”.
  5. Add support to run that new command using a joystick or some controller.

Code we can try adding:

ExampleSubsystem.java

import com.revrobotics.RelativeEncoder;
...

public class ExampleSubsystem extends SubsystemBase {
...
  private RelativeEncoder Encoder;

...
  public ExampleSubsystem() {
    ...

    Encoder = motor.getEncoder();
    Encoder.setPosition(0);


 ...

   public void periodic() {
...
    SmartDashboard.putNumber("Motor Speed", motor.get());
    SmartDashboard.putNumber("Motor (Encoder) Velocity", Encoder.getVelocity());
    SmartDashboard.putNumber("Motor (Encoder) Position", Encoder.getPosition());
 ...

  public double GetPosition () {
    return Encoder.getPosition();
  }

ExampleCommand.java

public class ExampleCommand extends Command {
...
  private double m_target_distance;
  private double m_current_distance;
  private double m_distance_tolerance;

...

  // Called when the command is initially scheduled.
  @Override
  public void initialize() {
    m_target_distance = SmartDashboard.getNumber("Target Distance", 10.0);
    m_distance_tolerance = SmartDashboard.getNumber("Position Tolerance", 2.0);
  }

  // Called every time the scheduler runs while the command is scheduled.
  @Override
  public void execute() {
    m_current_distance=m_subsystem.GetPosition();
    if (m_current_distance<m_target_distance)
      m_subsystem.SetSpeed(MotorSpeedConstants.WALK_FORWARD);
    else if (m_current_distance>m_target_distance)
      m_subsystem.SetSpeed(MotorSpeedConstants.WALK_BACKWARD);
  }


  // Called once the command ends or is interrupted.
  @Override
  public void end(boolean interrupted) {
    m_subsystem.SetSpeed(0);
  }


  // Returns true when the command should end.
  @Override
  public boolean isFinished() {
    if (Math.abs(m_current_distance-m_target_distance)<m_distance_tolerance)
      return true;
    else
      return false;
  }
}

Robot Container.java

// Replace with CommandPS4Controller or CommandJoystick if needed
  private final CommandPS4Controller m_driverController =
      new CommandPS4Controller(OperatorConstants.kDriverControllerPort);
...

  public RobotContainer() {


...

    SmartDashboard.putNumber("Target Distance", 10.0);
    SmartDashboard.putNumber("Position Tolerance", 2.0);
    SmartDashboard.putData("Walk To Position Command", new ExampleCommand(m_exampleSubsystem));
    // Configure the trigger bindings
    configureBindings();

...
  private void configureBindings() {
    // Schedule `ExampleCommand` when `exampleCondition` changes to `true`
    //new Trigger(m_exampleSubsystem::exampleCondition)
    //    .onTrue(new ExampleCommand(m_exampleSubsystem));

    // Schedule `exampleMethodCommand` when the Xbox controller's B button is pressed,
    // cancelling on release.
    m_driverController.cross().onTrue(new ExampleCommand(m_exampleSubsystem));
  }
Try to build and compile again.  You will now be able to either use the Dashboard button or controller button to execute the command to “Walk To Position”.  You will want to add these to your Elastic dashboard, making sure to select the “Show Submit Button” for the Target Position and Position Tolerance widgets.  Give it a try, how small of a tolerance works?  Why can we stop at the exact Target Position?
What if we could more optimally move to that distance and have less or even zero tolerance?  This is where the concept of PID comes into picture.  This video provides a good overview:

Software Training Session 1

Training material and helpful references for FIRST Robotics Competition (FRC) software development.

Part 1

WPILib is our main source for everything related to FRC robot programming. Here is the main starting page for their website:

WPI is short for Worcester Polytechnic Institute, which is a college that maintains the code base that we build upon. On your own computer (Windows or Mac) it’s possible to install the tools and software needed that would allow you to get familiar with the programming environment and even try to compile some code without any robot hardware.

To do so, first install WPILIB software following steps here (NOTE: large 2.5 GB download):

Once installed, this page provides steps to generate an Example “Getting Started” program in Java, which is the language our team (uses along with 89% of FRC teams)

The goal of this step is to be able to simple “Build” this program and ensure it builds (compiles) clean without any errors.

Part 2:

Next we will attempt to create a simple program that builds and is deployable on our test Roborio platform to spin a motor in a forward or reverse direction.

First is to again follow similar steps as done before to generate an Example program, but instead we will want to select:

  • Project Type: Template
  • Language: Java
  • Project Base: Command Robot

Once created, ensure it Builds without error.  Next, we will be controlling the motor using a motor controller called a SPARK MAX Motor Controller.  We first need to install the vendor library for this.  This can be done by navigating to the left side tab for “WPILib Vendor Dependencies”, and clicking install for “REVLib”:

This allows us to directly leverage java code from a library provided by REV Robotics, the company that makes the motor controller. You will see the following if it installed as expected:

In the ExampleSubsystem.java, you will need to include these 2 new imports near the top of the file where you see a few other “import” lines already:

  import com.revrobotics.spark.SparkLowLevel.MotorType;
  import com.revrobotics.spark.SparkMax;

Next we can simply declare the new SparkMax object, instantiate it, and use the set() function with a value that will result in spinning the motor:


public class ExampleSubsystem extends SubsystemBase {
  /** Creates a new ExampleSubsystem. */
  private SparkMax motor;

  public ExampleSubsystem() {
    motor = new SparkMax(20, MotorType.kBrushless);
    motor.set(0.02);
}

The set() command takes values between 1.0 and -1.0, where +/- represents different spinning directions.  For this test, DO NOT SET THE MAX/MIN VALUEs to 1.0 or -1.0, try values like 0.1 and -0.1.

Next ensure the code builds clean.  If so, next step will be to deploy the code to the Roborio and enable it.  But first we will need to install the FRC tools which includes the driver station. This is only available for Windows computers.  To install follow steps at:

https://docs.wpilib.org/en/stable/docs/zero-to-robot/step-2/frc-game-tools.html

NOTES:

  • If you can not reach the reach the FRC game tools download site either because you do not have a login or school firewall blocks it, check with mentor as we have it on a USB stick.
  • If you are on a Mac, you can try this Driver Station code someone developed:

https://boomaa23.github.io/open-ds/#download

Once installed, you should be now able to connect to the Roborio (directly via USB or if Radio available via WIFI), deploy and test your code to see if the motor spins.  Work with a mentor or another student familiar with the process.

During testing, notice in the Roborio’s status message window some red errors related to the Xbox controller not being found or accessible via USB.  This is because the within RobotContainer.java a controller is setup to be used.  For now try to resolve this by commenting out the following like in that file like so, and they build and deploy again to confirm this issue is no longer reported:

//configureBindings();

Extras:

For reference, this ~38 minute Youtube video created by an FRC team student provides a good introduction that is relates to creating a Test program in Java:

The slides presented in the video can be found here:

Programming Hitchhikers FRC Robotics
Some key points at it relates to our team:

  • We use java.
  • We use the command-based programming (vs. timed).
  • We leverage (import) vendor libraries for motor controllers and sensors which are not included in the WPILIB install, examples:

Some potentially useful links:

Lastly for future reference, here is a discussion board that is very heavily used by the FIRST community: