
Part 1
WPILib is our main source for everything related to FRC robot programming. Here is the main starting page for their website:
WPI is short for Worcester Polytechnic Institute, which is a college that maintains the code base that we build upon. On your own computer (Windows or Mac) it’s possible to install the tools and software needed that would allow you to get familiar with the programming environment and even try to compile some code without any robot hardware.
To do so, first install WPILIB software following steps here (NOTE: large 2.5 GB download):
Once installed, this page provides steps to generate an Example “Getting Started” program in Java, which is the language our team (uses along with 89% of FRC teams)
The goal of this step is to be able to simple “Build” this program and ensure it builds (compiles) clean without any errors.
Part 2:
Next we will attempt to create a simple program that builds and is deployable on our test Roborio platform to spin a motor in a forward or reverse direction.
First is to again follow similar steps as done before to generate an Example program, but instead we will want to select:
- Project Type: Template
- Language: Java
- Project Base: Command Robot
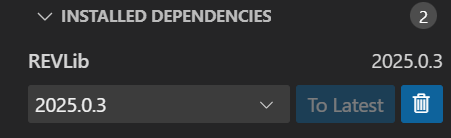
Once created, ensure it Builds without error. Next, we will be controlling the motor using a motor controller called a SPARK MAX Motor Controller. We first need to install the vendor library for this. This can be done by navigating to the left side tab for “WPILib Vendor Dependencies”, and clicking install for “REVLib”:
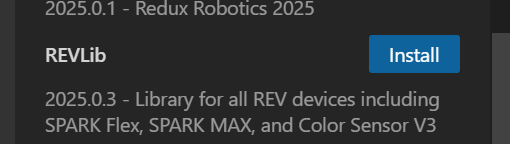
This allows us to directly leverage java code from a library provided by REV Robotics, the company that makes the motor controller. You will see the following if it installed as expected:
In the ExampleSubsystem.java, you will need to include these 2 new imports near the top of the file where you see a few other “import” lines already:
import com.revrobotics.spark.SparkLowLevel.MotorType;import com.revrobotics.spark.SparkMax;
Next we can simply declare the new SparkMax object, instantiate it, and use the set() function with a value that will result in spinning the motor:
public class ExampleSubsystem extends SubsystemBase {/** Creates a new ExampleSubsystem. */private SparkMax motor;public ExampleSubsystem() {motor = new SparkMax(20, MotorType.kBrushless);motor.set(0.02);}
The set() command takes values between 1.0 and -1.0, where +/- represents different spinning directions. For this test, DO NOT SET THE MAX/MIN VALUEs to 1.0 or -1.0, try values like 0.1 and -0.1.
Next ensure the code builds clean. If so, next step will be to deploy the code to the Roborio and enable it. But first we will need to install the FRC tools which includes the driver station. This is only available for Windows computers. To install follow steps at:
https://docs.wpilib.org/en/stable/docs/zero-to-robot/step-2/frc-game-tools.html
NOTES:
- If you can not reach the reach the FRC game tools download site either because you do not have a login or school firewall blocks it, check with mentor as we have it on a USB stick.
- If you are on a Mac, you can try this Driver Station code someone developed:
https://boomaa23.github.io/open-ds/#download
Once installed, you should be now able to connect to the Roborio (directly via USB or if Radio available via WIFI), deploy and test your code to see if the motor spins. Work with a mentor or another student familiar with the process.
During testing, notice in the Roborio’s status message window some red errors related to the Xbox controller not being found or accessible via USB. This is because the within RobotContainer.java a controller is setup to be used. For now try to resolve this by commenting out the following like in that file like so, and they build and deploy again to confirm this issue is no longer reported:
//configureBindings();Extras:
For reference, this ~38 minute Youtube video created by an FRC team student provides a good introduction that is relates to creating a Test program in Java:
The slides presented in the video can be found here:
Programming Hitchhikers FRC Robotics
Some key points at it relates to our team:
- We use java.
- We use the command-based programming (vs. timed).
- We leverage (import) vendor libraries for motor controllers and sensors which are not included in the WPILIB install, examples:
- REV Robotics: https://docs.revrobotics.com/revlib
- CTR Electronics: https://docs.ctr-electronics.com/
- LaserCan from Grapple Robotics: https://grapplerobotics.au/product/lasercan/
Some potentially useful links:
- Misc FRC training videos mostly for software:
Lastly for future reference, here is a discussion board that is very heavily used by the FIRST community: